Technical Tip
Normally, debtor receipts are posted against the debtor in the Micronet Distribution System and then posted to the General Ledger.
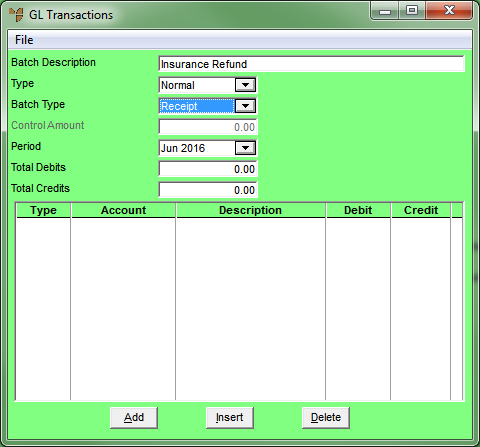
Complete this procedure if you selected a Batch Type of Receipt on the GL Transactions screen. Receipt batches are used to enter manual (i.e. non-debtor) receipts directly into the General Ledger. Examples of receipt transactions include sundry income such as interest received.
|
|
|
Technical Tip Normally, debtor receipts are posted against the debtor in the Micronet Distribution System and then posted to the General Ledger. |
Refer to "Creating a New GL Transaction Batch" or "Recalling a GL Transaction Batch".
Micronet displays the GL Transactions screen.

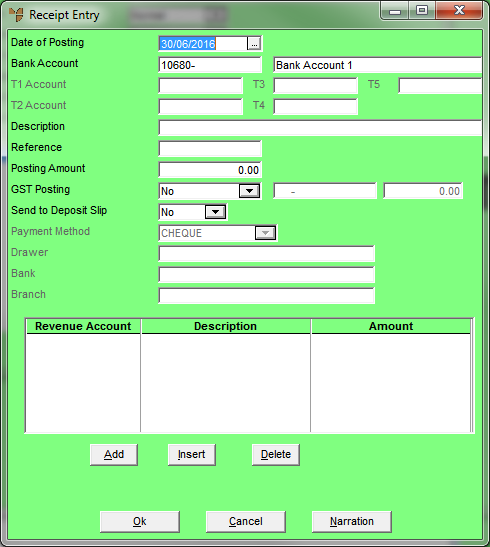
If you selected to add, insert or edit a receipt, Micronet displays the Receipt Entry screen.

|
|
Field |
Value |
|
|
Date of Posting |
Enter the transaction date. This defaults to the computer's system date but you can change it by selecting a different date or by entering a date in DDMMYY format. |
|
|
|
Warning Regardless of the date entered, Micronet posts the transaction to the period selected on the GL Transactions screen. |
|
|
|
Technical Tip When entering many transactions for a date that is not the same as the computer's system date, you can set the date manually - refer to "Maintenance - Change Local Date (Set Local Date)". |
|
|
Bank Account |
Select the bank account to be used for these receipt transactions. The selected bank account is used for all receipt transactions in the current batch. Micronet automatically debits the selected bank account for the receipt after entering the income account to post the credit to. |
|
T1, T2, T3, T4, T5 Account |
If T accounts are enabled in your system, select a T1, T2, T3, T4 and/or T5 account to be associated with the (debit) bank posting. If you enter an incorrect account, Micronet displays a list of all available T accounts. |
|
|
|
Description |
Enter a meaningful description of the receipt transaction. This description displays on account inquiries. |
|
Reference |
Enter the receipt reference number. If an automatic credit on a bank statement, use the bank statement page number as the reference. The reference displays on account inquiries. The reference increments by one on subsequent transactions. |
|
|
Posting Amount |
Enter the amount of the receipt transaction. This should be the total amount of the transaction. |
|
|
GST Posting |
Select whether GST is applicable to the receipt amount. Options are:
|
|
|
[GST Posting Account] |
Micronet displays the GST Collected account as defined in your company configuration (refer to "Edit - Applications - MGL - Special Accounts"). |
|
|
[GST Posting Amount] |
The GST Posting amount is calculated as 1/11 of the total posting amount. If the GST Posting amount is not 1/11, override the GST amount to the correct amount for the transaction. |
|
Send to Deposit Slip |
Select Yes if the receipt transaction is to be posted to the Micronet deposit slip. |
|
|
Payment Method |
If you selected Yes in the Send to Deposit Slip field, select the payment method to be posted to the deposit slip. |
|
|
Drawer |
If you selected Cheque in the Payment Method field, enter the name of the drawer on the cheque. |
|
|
Bank |
Enter the name of the bank on the cheque. |
|
|
Branch |
Enter the name of the branch on the cheque. |
Refer to "Receipt Entry - Revenue Entry".
Refer to "Receipt Entry - Narration".
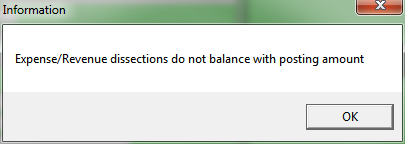
If the amount dissected on the Revenue Entry screen does not match the Posting Amount entered on the Receipt Entry screen, Micronet displays the following message.

Micronet will not allow you to save the receipt until these amounts balance.
When the receipt amounts balance, if you selected to add a receipt, Micronet redisplays the Receipt Entry screen so you can add further receipts.
Micronet redisplays the GL Transactions screen showing all the receipts added.
Refer to "Managing Completed GL Transaction Batches".